

Welcome to Your Green Home Journey
Most contractors sell only what they install. However...
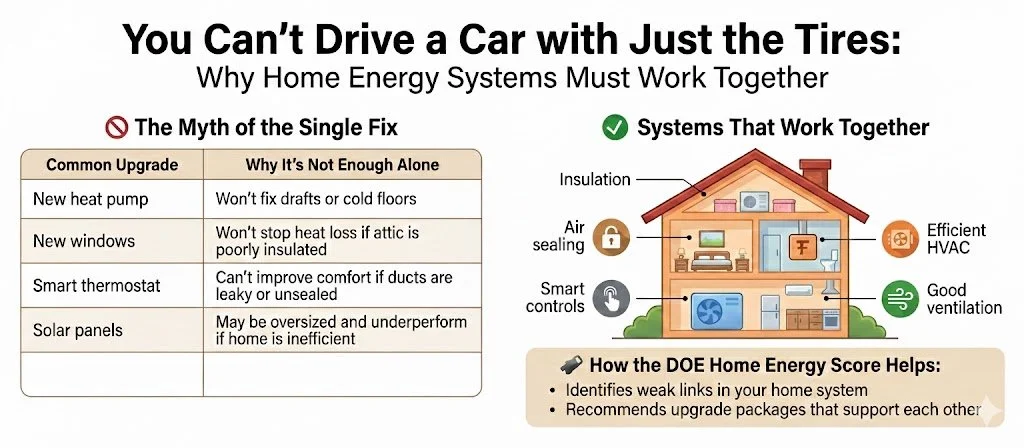
Heat, air, and moisture do not stay politely in one place. They move across connected surfaces—not just through furnaces or windows. Therefore, it makes sense to look at the house-as-a-system. A great starting point is the logic behind the Department of Energy's Home Energy Score (HES). Whether you use our AI guided home energy assessment software tool to get started or have an existing professional assessment like a HES, both are based on the same underlying modeling logic and building science background that treats a home as one interconnected system. This assessment is the first step for a good plan that can be implemented all at once or over time.
The sections below show you what to collect, why it matters, and how it connects to building science. Open one section at a time as you walk your home. Use a notebook or our Data Collection Form to record your findings first.
- Project/home name and address or cross streets
- ZIP code, year built, conditioned floor area, and number of stories
- Average ceiling height and climate zone, if known
This sets the baseline. The home’s age, size, height, and location help estimate heating and cooling loads, likely insulation levels, and the climate conditions the home must perform under.
This helps define the thermal boundary, the volume of conditioned space, and the basic load assumptions used for comfort and retrofit planning.
Identify the layer separating conditioned living space from the outdoors or unconditioned space:
- Attic/Ceiling Type: Vented, unvented, cathedral, finished/knee walls, none, or unknown.
- Insulation Levels: Floor/ceiling insulation, from none/R-0 to high/R-49+, or roof deck insulation if the boundary is at the roofline.
- Roof Deck Insulation: Only use this if the thermal boundary is at the roof deck.
- Air Sealing Status: Yes, no, partial, or unknown.
- HVAC & Layout Clues: Note any ducts, air handlers, finished attic spaces, knee walls, or other clues that affect where the thermal boundary is located.
The attic or roof area is a critical control layer. Green Home Predictor maps this area so pros can tailor the right upgrade strategy:
- Boundary at Attic Floor: Focuses on air sealing, insulation depth, baffles, blocking, and proper attic ventilation.
- Boundary at Roof Deck: Focuses on roof deck insulation, encapsulation, moisture control, and whether ducts or equipment are being brought inside the conditioned space.
⚠️ Crucial for HVAC: Getting this right helps prevent errors when sizing new heating and cooling systems, because ducts and equipment can perform very differently depending on whether they sit inside or outside the thermal boundary.
Identify how the bottom of the home separates conditioned living space from the ground, outdoor air, or unconditioned space:
- Foundation Type: Conditioned basement, unconditioned basement, slab, vented crawlspace, unvented crawlspace, mixed, or unknown.
- Foundation Insulation Level: Unknown, none/R-0, some/low, moderate, or high/R-19.
- Rim Joist Status: Whether rim joists appear sealed and insulated: yes, no, partial, or unknown.
- Thermal Boundary Clues: Note whether the boundary appears to be at the foundation walls, the floor above the basement/crawlspace, the crawlspace walls, or the slab edge.
- HVAC & Layout Clues: Note any ducts, air handlers, boilers, furnaces, water heaters, or distribution piping located in the basement or crawlspace.
- Moisture & Safety Clues: Note visible moisture, bulk water, mold risk, dirt floors, open vents, combustion appliances, or other issues that should be reviewed before insulation or air sealing work.
The foundation is the home’s bottom control layer. Green Home Predictor maps this area so pros can understand whether the basement or crawlspace is inside or outside the home’s thermal boundary.
- Conditioned Basement or Unvented Crawlspace: The focus may be foundation wall insulation, rim-joist sealing, moisture control, and keeping ducts or equipment inside the conditioned space.
- Unconditioned Basement or Vented Crawlspace: The focus may shift to the floor above, duct sealing/insulation, pipe protection, air leakage, and whether the space should remain outside the thermal boundary.
- Slab Foundation: The focus may include slab-edge conditions, floor comfort, moisture clues, and how the slab affects heating and cooling loads.
“An uninsulated basement is like living over a cold cave. You’re heating it whether you want to or not.”
⚠️ Crucial for HVAC: Getting the foundation boundary right helps prevent mistakes when planning heating and cooling upgrades. Ducts, boilers, air handlers, crawlspaces, rim joists, and basement walls can all affect comfort, load calculations, equipment sizing, and whether insulation or air sealing should happen before or alongside HVAC work.
- Wall insulation level: unknown, none/R-0, some/low, moderate, or high
- Notes about wall construction, siding, or known insulation work if available
Walls are the largest surface area of your envelope. Adding continuous insulation during re-siding is a "once in a generation" upgrade opportunity.
If your home has wood frame construction and no additional wall insulation has been installed since it was built, you can use U.S. Department of Energy defaults based on your home's age and wall thickness.
- Step 1: Determine Framing. Measure the depth of an exterior door jamb (excluding trim). Approximately 4.5 inches indicates 2x4 framing. Approximately 6.5 inches indicates 2x6 framing.
- Step 2: Find Your R-Value. Select your region above to update the table, then match your built year and framing size.
| Built Year | 2x4 Framing | 2x6 Framing |
|---|
Source: U.S. Department of Energy. Learn more or find values for other regions using the Assessor Calculator at homeenergyscore.gov.
- Primary heating system type and fuel source
- Heating and cooling efficiency, if known, or year installed if efficiency is not known
- Cooling system type, including none, central AC, heat pump, mini-split, or window/room AC
- Secondary or supplemental systems, such as mini-splits, electric baseboard, wood/pellet stove, window AC, or backup systems
- Distribution type, duct insulation, duct sealing status, and duct location
Look for a label on the furnace, boiler, heat pump, AC condenser, air handler, or mini-split outdoor unit. If you cannot find AFUE, SEER, HSPF, COP, or EER, record the approximate year installed. Taking a photo of the equipment label is often easier than writing everything down.
Leaky ducts in an attic can waste 30% of your energy before it even reaches your rooms. Sealing ducts is often higher ROI than replacing the furnace itself.
If the homeowner does not know the exact efficiency, our tool can use default values based on the approximate install year. These are planning assumptions only and may need contractor verification.
Many homeowners know roughly when their equipment was installed, even if they do not know AFUE, SEER, or HSPF. That makes install year a practical way to create a first-pass efficiency estimate for budgeting and retrofit planning.
- Water heater type: gas storage, electric storage, heat pump water heater, tankless, indirect/boiler, or other
- Fuel: natural gas, electric, propane, oil, boiler-connected, or unknown
- Energy Factor / Uniform Energy Factor (EF/UEF), if known, or year installed
Water heating is usually the 2nd largest energy expense. Moving to a Heat Pump Water Heater can reduce this cost substantially in many homes.
As with heating and cooling equipment, a clear photo of the water heater label is often the easiest way to capture the useful information.
- Panel status: adequate/modern, older but functional, possible upgrade needed, unsafe/needs electrician, or unknown
- Service amps and main breaker rating, if visible
- Whether panel space and open 240V space appear available
- Panel photo and main breaker/panel label photo
Do not remove the panel cover or touch wiring. Only observe what is visible from the outside or from the normal hinged panel door. If anything looks damaged, overheated, loose, wet, or unsafe, mark it for electrician review.
Electrification may add future loads such as heat pumps, heat pump water heaters, induction ranges, EV chargers, batteries, or solar equipment. The Step 1 audit does not replace an electrician’s load calculation, but it helps flag whether electrical readiness should be reviewed early.
- Approximate window area as a percentage of wall area
- Window type: single pane, single + storms, double pane clear, double pane low-E, triple pane, or mixed/unknown
- Notes about unusual window conditions, if helpful
Windows are the "zippers" of your thermal coat. They can be major sources of heat loss, comfort problems, and radiant heat gain.
- Mechanical ventilation: none known, bath fans only, kitchen exhaust, HRV/ERV, fresh-air duct, other, or unknown
- Visible combustion appliances: gas furnace, gas boiler, gas water heater, gas fireplace, gas range/oven, wood/pellet stove, none known, or unknown
- Moisture / IAQ concerns: musty basement, mold concern, condensation, ice dams, poor bath/kitchen exhaust, none observed, or notes
This is not a combustion safety test. Do not test, adjust, or diagnose combustion equipment yourself. The goal is simply to note visible appliances and moisture/ventilation clues so the plan can flag what a qualified professional may need to verify before air sealing, insulation, or electrification work.
A tighter home can be more comfortable and efficient, but it also needs moisture control, good exhaust, and safe appliance sequencing. These observations help the plan avoid treating insulation, ventilation, and equipment as separate silos.
- Optional electric usage: annual kWh or monthly average, or a bill photo
- Optional gas/fuel usage: annual therms/gallons or monthly average, or a bill photo
- Photos: front exterior, other sides, attic/insulation, rim joist, foundation wall, equipment labels, electrical panel, windows, and problem areas
- Homeowner priorities: high bills, comfort, electrification, health/IAQ, resale, contractor bid, rebate readiness, timing, urgency, and budget sensitivity
Utility use can help reality-check the model later, while photos reduce guesswork. Homeowner priorities do not change the physical facts of the home, but they do help shape the next-step pathway, contractor conversation, and budget planning.
- Solar status: existing solar, solar planned/interested, no solar, or unknown
- System size or annual production if known
- EV charger present or planned, battery present/planned, or interest in a net-zero/net-ready pathway
Solar helps close the gap between a high-performance electric home and a net-zero or net-ready home. First reduce the load with envelope and equipment improvements; then solar can offset what remains.
🚀 Ready to generate your score?
Visit the GHC's Step 1 Audit Tool to enter your data. Then, take that score to
Step 2 to build your roadmap.